Wednesday, January 26, 2011

Inbouwen ctcss in een Yaesu FT-225RD / how to build ctcss in a Yaesu FT-225RD

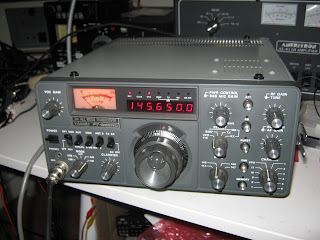
Ondanks de leeftijd is de Yaesu FT-225RD nog steeds een zeer goede 2 meter transceiver; degelijk gebouwd, all mode (zelfs AM), echte S-meter en door de modulaire bouw met insteekboards ook makkelijk te repareren.
Een van de zaken die node gemist worden is ctcss, over repeaters werken kan dus niet meer.
In mijn regio werken de repeaters met een subtone van 71.9 hz, deze ga ik dus inbouwen.
Terry Cotton ZS1AYJ mailde me een heel slimme oplossing. Omdat ik een ctcss unit van CS Technology gebruik, kon ik de oplossing van Terry eenvoudig toepassen.
Despite it's age the Yaesu FT-225RD still is a very good 2 meter transceiver; rugged, all mode (even AM), a real S-meter and due to modulair build easy to repair.
One of the things this transceiver does not have is a ctcss unit, so transmitting via repeaters is not possible anymore. In my area repeaters use a 71.9 hz subtone, i will add this to my FT-225RD
Terry Cotton ZS1AYJ mailed me a very smart solution. Because i use a ctcss unit from CS Technology, i could apply his solution very easy.

Je hebt dus een ctcss unit nodig; CS Technology heeft een 16 toons kit in haar programma voor 11 engelse ponden. Deze kit bestaat uit een kleine printplaat van hoogwaardige kwaliteit en alle onderdelen.
Voor de ic's heb ik wel ic-voetjes gebruikt, handig als je een ic er per ongeluk verkeerd in soldeert!

What you need is a ctcss unit; CS Technology has a 16 tone kit available for the price of 11 UK Pounds.
The kit has a high quality pcb and all parts you need. To avoid mistakes i use sockets for the ic's.

De gewenste tone kun je door middel van jumpers instellen. in mijn geval dus 71.9 hz.
De voedingsspanning van deze unit is volgens de fabrikant 7 tot 16 volt; in de praktijk werkt de unit al bij 6.2 volt.
Om de unit in te bouwen, draai je de set om met het vfo naar je toe. Nu zie je de onderkant van 2 rijen connectors. Rechtsonder wordt de unit aangesloten, zie foto voor details.

You can set the tone you want by jumpers, as said for me 71.9 hz.
According to factory specs this unit needs 7 to 16 volts, but mine starts working at 6.2 volts.
Now turn your ft-225 and remove the bottom case. Point the vfo to you and on the right the unit will be connected, see photo for details.


Neem de min en de ptt van de ctss unit samen en soldeer deze aan de massa van de connector, zie de zwarte cirkel

Soldeer de plus van de ctcss unit aan de wit/blauwe draad van J21 zie de rode cirkel

Soldeer de tone-uitgang van de ctcss unit met een 47K weerstand aan de blauwe draad zoals te zien in de blauwe cirkel. (de weerstand zit in krimpkous en is dus niet te zien)

Als nu de repeaterswitch wordt ingeschakeld EN de microfoon wordt ingedrukt, dan komt er ongeveer 8 volt op de plus van de ctcss unit en gaat deze dus werken.

Op deze manier is de FT-225RD voorzien van ctcss zonder dat er iets aan verbouwd hoeft te worden!
Dek nu de unit met een stukje plastic oid af en schroef de kast weer dicht.

Put the ground and ptt from the ctcss unit together and solder this to ground of the connector as seen at the black circle

Solder the + volt from the ctcss unit on the blue/white wire of J21 as seen at the red circle

Solder tone-out of the ctcss unit with a resistor of 47K on the blue wire as seen at the blue circle (note the resitor is covered in a small heat shrink tube)

If the repeaterswitch is set to on AND the microphone is pressed, a voltage of approx 8 volts will be activated on the + of this unit and starts to work.
Now your FT-225RD has ctcss without changing or modifying this radio!
Cover the unit with a piece of plastic or something like that and put the case back on  the radio.

Website CS Technology: http://www.cstech.co.uk/radio.html

Heb je nu een ctcss unit die alleen op hogere spanningen werkt dan 8 volt, dan heeft Jeroen PA3JT een andere oplossing.
If you have a ctcss unit which only works on higher voltages than 8 volts, Jeroen PA3JT has another solution.

Friday, January 21, 2011

Yaesu FT-101ZD MK3 elco's vervangen / capacitor replacements

Oude transceivers zijn leuk om te verzamelen; ze zijn goedkoop en relatief makkelijk zelf te repareren.
Maar er zitten ook nadelen aan, zo zijn onderdelen niet meer of moeilijk te verkrijgen en bijv. elco's gaan na 30 jaar lekken en dienen dan vervangen te worden.
Vorige week kwam ik in het bezit van een yaesu ft-101ZD MK3, incl optioneel AM-board, cw-filter en ventilator (ja dat was een optie). Ik had al een yaesu ft-101ZD MK0, dus dit was een mooie aanvulling.
De elco's van het rectifierboard waren allemaal slecht, dus tijd voor een klusje!

Old transecivers are very nice to collect; they are cheap and quit easy to repare them by yourself.
Hence some disadvantages are that spareparts are hard or not to get, and f.e. capacitors starting to leak after 30 years and need to be replaced.
Last week i acquired a yaesu ft-101ZD MK3 incl optional AM board, cw-filter and cooling fan (yes it was an option). I had already a ft-101ZD MK0 so this was a nice completion.
Because the caps of the rectifierboard were bad, it's time to start!


PB-1968B rectifierboard FT-101ZD MK3

Let op! Er komen HOGE spanningen in deze set en ook op dit board voor, dus zorg dat alles ontladen is voordat je begint!
Be Ware! Some HIGH voltages are present in this transceiver and also on this board, so please discharge all caps before starting!


Makkelijkste is om het board los te schroeven en voorover te laten hangen, soldeer dus de draden niet los!
It's most easy to unsrew the board and bend it over, let the wires unsoldered!
Elco's vervangen en board is weer gemonteerd.
Caps replaced and board mounted.

Dit waren de oude elco's..allemaal lek!
These were the old caps, they all do leak!

Beide FT-101ZD's Links MK0, rechts MK3
Both FT-101ZD's Left MK0, right MK3
Zie het verschil, links MK0, rechts de vervangen elco's MK3
See the difference, left MK0, right replaced caps on MK3

De 2 500 volts elco's waren nog prima in orde, dus deze zijn niet vervangen.
Wel heb ik de primaire spanning van de trafo op 234 volt gezet ipv 220 volt en alles goed schoon gemaakt en de contacten gereinigd.
Beide oude zusters up and running!

Both 500 volt caps were just fine, so no need for replacement.
I did change the primary voltage of the transformer from 220 to 234 volts, and cleaned everything well, also cleaned all pots and swtiches.
Both old sisters are up and running!

Thursday, January 20, 2011

40 meter end-fed antenne

Na het succes van de 20 meter end-fed antenne stonden er bij Mark PA1SSB en ondergetekende nog end-feds voor andere banden op het programma. Mark heeft veel tijd gestoken in het maken van een goed werkende (resonante) 40 meter end-fed. Het resultaat zie je op de foto's.
Door de gebruikte materialen was er een groter kastje nodig.
Ook is er een extra aansluiting gemaakt waar eventueel een radiaal aan gemaakt kan worden.

After completion of our 20 meter end-fed antenna, Mark PA1SSB and i had plans to build more end-fed antennas for other bands. Mark put a lot of time and effort to build a well performing 40 meter end-fed. You can see the results on the pics. An extra connector was made for an optional radial.

40 meter end-fed

SWR 1.5 op 40 meter, niet slecht.
VSWR 1.5 on 40 meter, not too bad.


Wednesday, January 5, 2011

MSP430 Launchpad (1)

Een hele goedkope manier om met microprocessors te experimenteren is het aanschaffen van dit launchpad.
Voor het schamele bedrag van 4,30 US Dollar(incl verzendkosten) bestel je bij Texas Instruments deze startkit.
Je ontvangt dan  via DHL deze kit bestaande uit launchpad, 2 microprocessoren, een kristal, aansluitklemmen en een mini-usb kabel. Via het softwareportal van Texas Instruments kun je gratis CodeComposer Studio downloaden en een groot aantal demo's.

A very easy and afordable way to play and experiment with microprocessors is to buy this Texas Instruments launchpad. Just for a lousy 4,30 USD incl shipping it's all yours!
The kit contains a launchpad, 2 microprocessors a crystal, connectors and a mini usb cable.
Texas Instrument's softwareportal allows you to download the free CodeComposer Studio and many other demo's.

Launchpad aangesloten op de laptop.
Launchpad connected to the laptop.